Starting Guide
This page is a starting guide for setting up the Xonai Accelerator for EMR with configuration objects you can reuse across your EMR Spark applications, and examples how to activate the Xonai Accelerator via different interfaces.
Prerequisites
The Xonai Accelerator is compatible with the EMR runtime versions listed in the following table:
Spark version |
EMR release |
|---|---|
3.5.2 |
7.5.0 |
7.4.0 |
|
3.5.1 |
7.3.0 |
7.2.0 |
|
3.5.0 |
7.1.0 |
7.0.0 |
|
3.4.1 |
6.15.0 |
6.14.0 |
|
6.13.0 |
|
3.4.0 |
6.12.0 |
3.3.2 |
6.11.1 |
6.11.0 |
|
3.3.1 |
6.10.1 |
6.10.0 |
|
3.3.0 |
6.9.1 |
6.9.0 |
|
6.8.1 |
|
6.8.0 |
|
3.2.1 |
6.7.0 |
3.2.0 |
6.6.0 |
3.1.2 |
6.5.0 |
6.4.0 |
|
3.1.1 |
6.3.1 |
6.3.0 |
For more information about EMR runtimes, please see the EMR 6.x release notes and EMR 7.x release notes.
Create Configuration File
Create a file named xonai-properties.json with the following JSON content and edit <runtime>, <release> and <arch> placeholders with:
The EMR runtime version you are using (e.g.
6.7.0)The Xonai JAR release version you want to use
The EMR Node processor architecture:
amd64for Intel/AMD orarm64for Graviton
[
  {
    "Classification":"spark-defaults",
    "Properties":{
      "spark.jars":"s3://<your-bucket>/xonai-spark-plugin-emr-<runtime>-<release>-stable-linux-<arch>.jar",
      "spark.plugins":"com.xonai.spark.SQLPlugin"
    }
  }
]
Then, copy it to a location in S3 accessible from your EMR cluster. Such configurations can be used when launching EMR clusters to automatically activate the plugin without the needing to change each individual Spark application configuration.
Attention
If any of the properties in the default configuration file is overridden in spark-submit or equivalent, the overridden ones need to be appended there.
This guide assumes you created a single configuration file named xonai-properties.json for the sake of simplicity, but you may want to create a few configuration files with distinct names if you are using multiple EMR runtime versions and processor architectures in your environment.
Activation via EMR Console
The Xonai Accelerator can be activated on clusters created via the EMR console or cloned from existing cluster IDs as described in this section.
In the “Clusters” section of Amazon EMR, click “Create cluster” or clone an existing one.

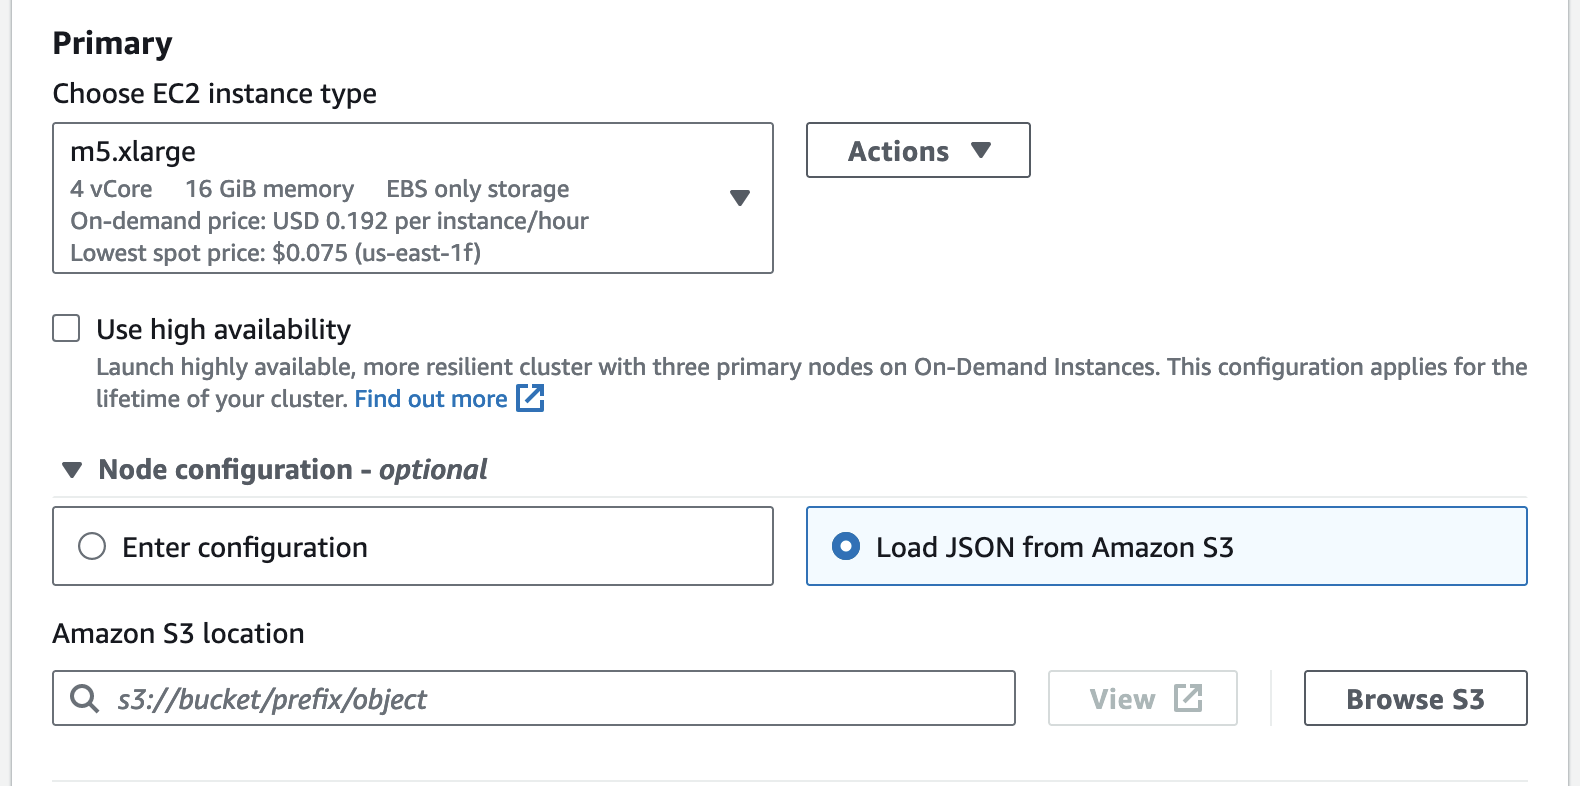
Set up the configuration JSON script in the “Cluster configuration” section and only for the “Primary” node.
Expand the “Node configuration” panel, click “Load JSON from Amazon S3” and copy the location of xonai-properties.json to “Amazon S3 location”.
Now you can launch your application with the Xonai Accelerator if you had cloned an existing cluster or simply continuing configuring the new cluster you just created from scratch.
Activation via AWS CLI
The Xonai Accelerator can be activated via AWS command-line interface as described in this section.
Before creating the cluster, copy the following script and edit key-pair-name to be the name of your personal key pair file (*.pem file name but without the extension).
export KEYNAME=<key-pair-name>
export CLUSTER_NAME=xonai-spark-cluster
export EMR_RELEASE_LABEL=emr-6.7.0
export INSTANCE_TYPE=m5.xlarge
export CONFIG_JSON_LOCATION=./xonai-configuration.json
Create the EMR cluster with the following command, which on successful creation it should output JSON containing values such as the ID of the new cluster:
aws emr create-cluster \
  --name $CLUSTER_NAME \
  --release-label $EMR_RELEASE_LABEL \
  --service-role EMR_DefaultRole \
  --applications Name=Hadoop Name=Spark \
  --ec2-attributes KeyName=$KEYNAME,InstanceProfile=EMR_EC2_DefaultRole \
  --instance-type $INSTANCE_TYPE \
  --configurations file://$CONFIG_JSON_LOCATION \
{
  "ClusterId": "j-3HWJEKDYQWKCU",
Note
It can take up to ~5 minutes to create a cluster.
Check if the cluster is waiting for steps to run with the following command, which should output JSON indicating the state of “WAITING”.
aws emr describe-cluster --cluster-id <cluster_id>
{
  "Cluster": {
    "Id": "j-3HWJEKDYQWKCU",
    "Name": "xonai-spark-cluster",
    "Status": {
      "State": "WAITING",
      "StateChangeReason": {
        "Message": "Cluster ready to run steps."
Submit a Spark Application to the EMR Cluster With Xonai
SSH into the master node of the cluster in “WAITING” state with the following command:
aws emr ssh --cluster-id <cluster_id> --key-pair-file ~/<my-key-pair.pem>
Now you can submit a Xonai-accelerated Spark application just like any ordinary Spark application via spark-submit, for example:
spark-submit \
  --class org.apache.spark.examples.SparkPi \
  $SPARK_HOME/examples/jars/spark-examples.jar \
  1000
The console output should look like this in order to indicate that the plugin component was initialized.

Cluster Termination
When you are done submitting Spark applications, do not forget to terminate the cluster either via the “Terminate” button or via CLI:
aws emr terminate-clusters --cluster-id <cluster_id>
See the official Amazon EMR guide to learn more about launching EMR clusters.