Databricks Compute
Prerequisites
Supported Types of Compute
The Xonai Accelerator can be activated in the following types of compute:
All-purpose compute
Job compute
Info
Support for other types of compute may be added in the future.
For more information about Databricks types of compute, please refer to the Databricks compute documentation.
Supported Databricks Runtime Versions
The Xonai Accelerator is compatible with the Databricks runtime versions listed in the following table:
Spark version |
Databricks release |
|---|---|
3.5.0 |
15.4 LTS |
14.3 LTS |
|
3.4.1 |
13.3 LTS |
3.3.2 |
12.2 LTS |
3.3.0 |
11.3 LTS |
3.2.1 |
10.4 LTS |
3.1.2 |
9.1 LTS |
For more information about Databricks runtime releases, please refer to the Databricks release notes.
Installation on Unity Catalog
This article explains how Xonai can be installed on a Unity Catalog volume and activated on a cluster via an init script.
Create a Volume
To create a volume to store Xonai files:
Navigate to Catalog from the left navigation panel.
Click Create > Create Volume within the schema you want to create the volume (e.g.
/Volumes/main/default/).The Create a new volume dialog appears. Type xonai as the volume name and select Managed volume in Volume type.
Create an Init Script
After the volume is created:
Create a file with the following content and change the placeholders as described after:
1
2
%sh
cp <volume-path>/xonai/xonai-spark-plugin-dbx-<release>-<version>-stable-linux-<arch>.jar /databricks/jars/
Change
<volume-path>,<runtime>,<release>and<arch>placeholders with:The path for the the managed volume you created (e.g.
/Volumes/main/default/xonai).The Databricks runtime version you are using (e.g.
14.3).The Xonai JAR release version you want to use.
The Worker processor architecture:
amd64for Intel/AMD orarm64for Graviton/ARM.
Copy
xonai-init.shto the managed volume you created for Xonai (e.g./Volumes/main/default/xonai)
Info
You may want to create multiple configuration scripts with distinct names if you are using multiple Databricks runtime versions and processor architectures in your workspace.
Copy Xonai JARs
After the init script is created:
Click Upload to this volume at the top right corner.
The Upload files to volume dialog appears. Drag and drop or browse to the JAR(s) you want to upload, and click Upload.
Activation on All-Purpose Compute
The first step is to define the Xonai init script you created:
Navigate to Compute > All-purpose compute from the left navigation panel.
Edit an existing compute or create a new compute in Create compute top right corner.
Uncheck Use Photon Acceleration in Performance panel.
Click Advanced options to expand the section and then click Init Scripts tab.
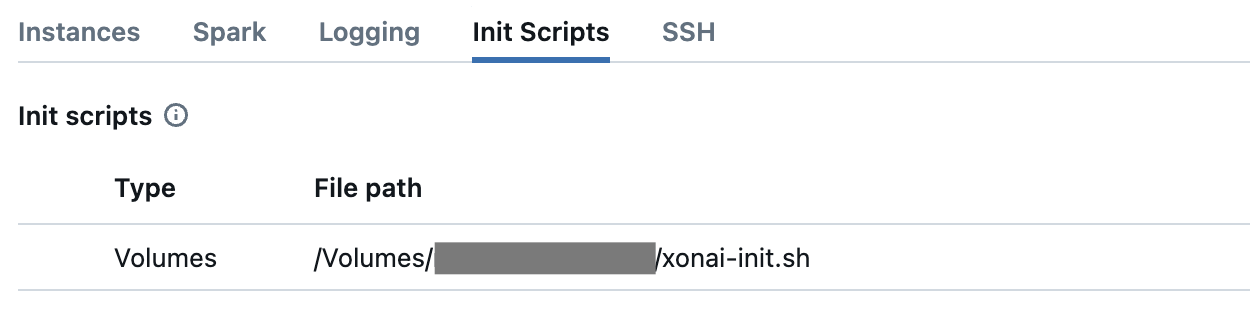
Select Volume as Source and then select the Xonai init script you created.
On completion it should look like this:
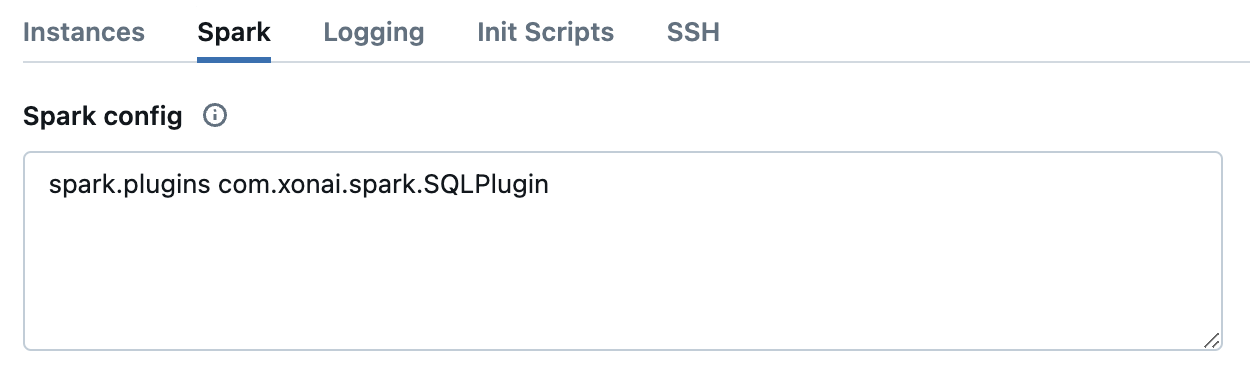
The second step is to define the required configuration for your Spark jobs. In the same Advanced options section, click Spark tab and copy the following code to Spark config.
spark.plugins com.xonai.spark.SQLPlugin
On completion it should look like this:
Your cluster is now configured to run the Xonai Accelerator in your Spark jobs.
Activation on Jobs Compute
The first step is to define the Xonai init script you created:
Navigate to Job Runs > Jobs from the left navigation panel in Data Engineering section.
Click in the job you want to activate the Xonai Accelerator.
Click Compute > Configure in the right panel.
Click Advanced options to expand the section and then click Init Scripts tab.
Select Volume as Source and then select the Xonai init script you created.
On completion it should look like this:
The second step is to define the required configuration for your Spark jobs. In the same Advanced options section, click Spark tab and copy the following code to Spark config.
spark.plugins com.xonai.spark.SQLPlugin
On completion it should look like this:
Your cluster is now configured to run the Xonai Accelerator in your Spark jobs.